
Probe Installation


PROBE ISTALLATION for Windows
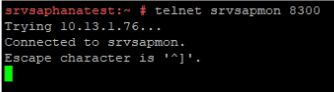
1 – Before starting the installation of SysRanger Probe for Windows, access to the 8100 and 8300 ports of the server where the SysRanger Server software is running on the server to be installed is controlled using “telnet”. If there is no access, permission for access must be obtained from the authorized unit.


2 – Before starting the installation of SysRanger Probe for Windows, check with “ping” whether the server to be installed and the SysRanger Server software can communicate with each other. If there is no communication, the authorized unit should be requested to provide communication.

3 – Download the SysRanger Probe installation files for Windows operating system from https://monitor.sysranger.com/downloads

4 – Create a new folder under disk C.

5 – Name the newly created folder "apps".

6 – Move the SysRanger Probe installation file downloaded in the second step to the “apps” folder we just created and extract the files from the compressed folder with the Extract All option.

7 – Go to the resulting folder named SysRangerProbe.

8 – Run the “windows_service_install.bat” file with the "run as administrator" option.

9 – Give the application permission to make changes with the yes option.

10 – After the installation is completed, exit the command line by pressing any key.

11 – Check that the status of the SysRanger Monitoring service is "Running" and the startup type is “Automatic” in Windows Services.

12 – To stop the SysRanger Monitoring service from Windows Services, select “Stop” from the right-click menu.

13 – From the menu that opens, select This account under the Log On option and enter the “SAP sidadm” user and confirm with OK.

14 – The config.ini file in the folder where SysRanger Probe is installed should be edited with “edit”.
In the line written “server.host”, the ”hostname” of the server where the SysRanger Server software is installed should be recorded, and in the line written server.port, the “port” information should be recorded.

15 – To start the SysRanger Monitoring service from Windows Services, right-click and select “Start” from the menu.

Installation of SysRanger Probe for Windows is complete. Now SysRanger Probe can transmit the data it obtains to SysRanger Server.
IMPORTANT
*** SysRanger Server uses ports 8100 and 8300 by default. SysRanger Probe software to be installed on application servers must access the 8100 and 8300 ports of the server on which the SysRanger Server software is installed.
*** Servers with SysRanger Server and SysRanger Probe installed must be able to “ping” each other.
*** In order to listen to the SAP Application Layer, SysRanger Server software must access ports 5XX13 and 1128 on the servers where SAP products (including the HANA database) are installed..
*** SysRanger Server software must access MsSQL 1433, ASE 4901, Oracle 1521, DB2 5912 ports on servers with other databases installed. These ports are default ports and may vary. It should be checked on the servers on which they are installed.
*** Servers with SysRanger Server and SysRanger Probe added to each other in their host files solves some problems.
PROBE ISTALLATION for Linux
1 – Before starting the installation of SysRanger Probe for Linux, the access of the server to be installed to the 8100 and 8300 ports of the server where the SysRanger Server software is running is controlled via telnet. If there is no access, authorization is requested from the relevant unit.
2 – Before starting the installation of SysRanger Probe for Linux, it is checked by pinging that the server to be installed and the SysRanger Server software are running. If there is no access, authorization is requested from the relevant unit.

3 – Download the SysRanger Probe installation files for the Linux operating system from https://monitor.sysranger.com/downloads


4 – Create the /usr/apps/sysranger/probe folder on the Linux server where the SysRanger Probe software will be installed, as follows.

5 – For the Linux operating system, the SysRanger Probe installation file is compressed in tar format. Extract this file using WinRAR and move it with the WinSCP program under the probe folder we just created under the Linux server where the SysRanger Probe software will be installed.


6 – After the files are moved, grant 4777 permission to the apps folder and its subdirectories using WinSCP.


7 – Run chmod u+x *.sh; sh installservice.sh under the /usr/apps/sysranger/probe/SysRangerProbe directory.

8 – The config.ini file in the folder where SysRanger Probe is installed must be edited with edit. In the line that says server.host, the hostname of the server on which the SysRanger Server software is installed is recorded, and in the line that says server.port, the port information is recorded.

9 – Run the ./menu.sh command in the folder where SysRanger Probe is installed and select the 4 Restart option from the menu that appears, and then exit with the 0 Quit option.

IMPORTANT
*** SysRanger Server uses ports 8100 and 8300 by default. SysRanger Probe software to be installed on application servers must access the 8100 and 8300 ports of the server on which the SysRanger Server software is installed.
*** Servers with SysRanger Server and SysRanger Probe installed must be able to ping each other.
*** In order to listen to the SAP Application layer, SysRanger Server software must access ports 5XX13 and 1128 on the servers where SAP products (including the HANA database) are installed.
*** SysRanger Server software must access MsSQL 1433, ASE 4901, Oracle 1521, DB2 5912 ports on servers with other databases installed. These ports are default ports and may vary. It should be checked on the servers on which they are installed.
*** The fact that SysRanger Server and SysRanger Probe installed servers have added each other to their host files solves some problems.
-
15
Overly Successful Customer
-
137
Server
-
4568
Phone Call
-
12567
E-Mail